FiOS With an AirPort Extreme
I have FiOS, and I’m pretty happy with the service. The FiOS router, however, pretty much sucks. There’s been long-standing reports of a limited NAT table on the Actiontec routers, which leads to some pretty significant performance degradation over a relatively short period of time. I’ve noticed that it becomes overwhelmed when I’m streaming short shows from Netflix on my second-gen AppleTV, or long YouTube videos, and I’m not even bringing up what it’s like if I watch a feature-length flick. A temporary fix is to reboot the Actiontec router that Verizon provides, but after a day or two we’re back in the same boat.
Further, the router has limited uPnP and Bonjour support which leads to flaky AppleTV streaming from computers or other iOS devices. Bonjour printer discovery just doesn’t work, nor does ePrint discovery. And the overall wireless signal isn’t great. Again, the router sucks.
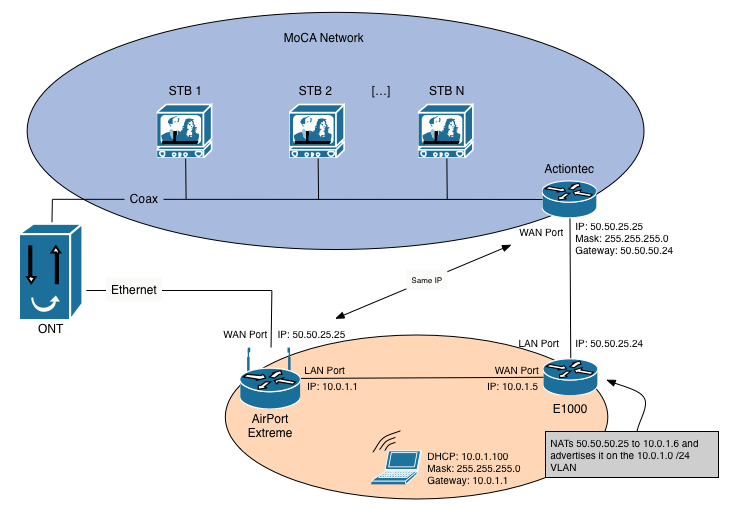
The fact that I noticed these issues, researched the root cause, and am inclined to fix the issue puts me into a very small group of people. And and most of us in this group would solve it the same way: use your own router. Sadly, it’s not an easy thing to do. Some features of the FiOS TV service, like Video on Demand and Remote DVR scheduling, run on an IP network across coax cable, called MoCA. The MoCA network uses the Actiontec router to get to the Internet for Video on Demand and as a connection point for the remote DVR manager (both using the iPhone/Android app and the FiOS website). So the Actiontec needs to stay online, connected to the coax network.
Marco Arment has a pretty good rundown of how to use your own router, but since he doesn’t have FiOS TV service, he stops short of a full solution for those of us who want our Video On Demand and remote DVR scheduling (from the iPhone/Android app or the web site) to continue to work. I’ll show you how I handled this.
Disclaimer: Follow my instructions at your own risk. Seriously. Your. Own. Risk.
Ingredients
- ONT (Optical Network Terminal): The big white box that Verizon installed in your house. Mine is in my basement. It’s where the fiber terminates in your home and is converted to other media (phone, coax, and ethernet).
- Actiontec router: I have the standard-issue MI424WR.
- Primary Router: The one you want to be your primary router when we’re all said and done. I’m using an AirPort Extreme1. I’m going to assume you are, too.
- NAT Router: You’ll need another (Yes, a third router) to do NAT translations from the MoCA network to your LAN. I picked up a Linksys E1000 from Amazon, and installed DD-WRT2. I’ll assume you’ve done the same.
- Several (at least 4) straight-through Ethernet cables. Don’t pay crazy prices for them. They’re cheap from Monoprice, or really easy to make.
There’s no reason this shouldn’t work with other routers or software. I’ve tested with the AirPort Extreme and the E1000 running DD-WRT, so I’m documenting as such, but you could very well run other hardware and software while applying the same concepts.
Process
The design of the network is complex for your typical home network. But, if you’ve read this far, you’re a geek and we often have atypical setups. Don’t worry, you’re among friends, here.
I used this post as a starting point, but I made a few modification for ease-of-installation and scalability.
Let’s start with the ONT. Out of the box, your Actiontec is plugged into the coax port on the ONT, and there’s nothing plugged into the ONT’s ethernet port. Verizon actually leaves the ethernet port disabled, unless you call them to have it turned on.
In the end, you’re going to leave the Actiontec plugged into the coax port, but you’ll have Verizon turn on the ethernet port. The ethernet port will connect to your AirPort Extreme’s WAN interface. One of the LAN ports on your AirPort Extreme will connect to the WAN port on your E1000, which will have one of its LAN ports connected to the WAN ethernet port of the Actiontec. It’ll look like this:
Preparation
- Before getting started, if you have any outstanding issues with your service, call Verizon and resolve them, now. You’ll need to start with a system that’s working exactly as designed.
- If you haven’t already, enable the Remote DVR feature with Verizon. You if you’re using an AirPort router as your primary, you won’t be able to enable the feature after we’re done. If you’re using another router, you’ll need to spoof the WAN MAC address of the Actiontec on your primary router to be able to enable the feature later on. The easiest thing to do is enable it ahead of time.
- Read this post and have your internet connection moved from the coax port to the ethernet port.
- Since you’re getting started with the Ethernet activated, you’ll have the coax port and WAN port on the Actiontec connected to the coax and ethernet port on the ONT, respectively.
- Read this post from beginning to end, at least once before getting started. Like I said, it’s complex. It’s worth taking the time to understand what you’re doing.
You’ll need to document the following before getting started. Here’s a subnet calculator to help out.
| Device | Interface | Value |
|---|---|---|
| FiOS Service | Public IP Address | |
| Public Subnet Mask | ||
| Public Default Gateway | ||
| AirPort Extreme | WAN MAC Address | |
| LAN MAC Address | ||
| LAN Network | ||
| LAN IP | ||
| LAN Subnet Mask | ||
| LAN Default Gateway | ||
| LAN Broadcast Address | ||
| Reserved LAN IP for E1000 | ||
| Reserved LAN IP for Actiontec | ||
| NAT Router | LAN MAC Address | |
| WAN IP Address | ||
| WAN Subnet Mask |
Now, we’ll start the step-by-step configuration.
AirPort Extreme
- Boot up the AirPort Extreme and connect your computer to one of the LAN Ports. You’ll obtain a DHCP address.
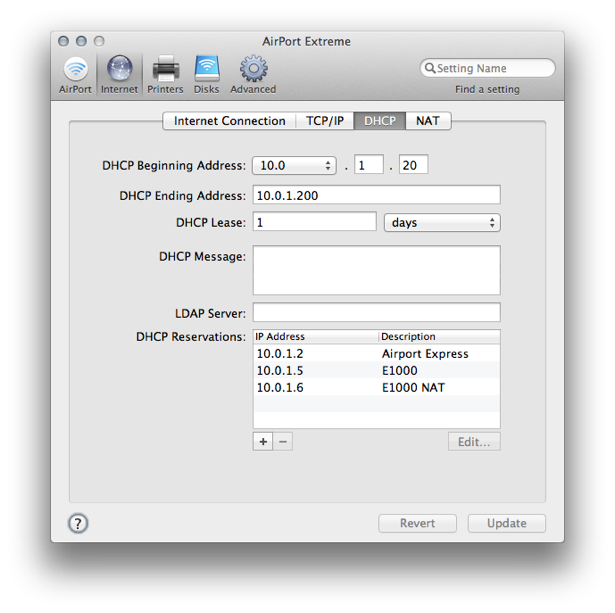
- You’ll want to create DHCP reservations for the E1000 and the NAT you’ll be creating. They’ll both be reserved to the MAC address of the WAN interface of your E1000. (I used 10.0.1.5 for the E1000, and 10.0.1.6 for the NAT). See the image below.
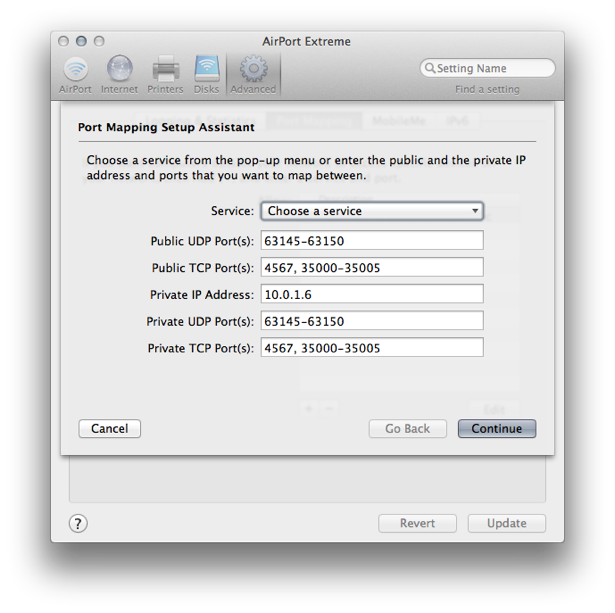
- Click on the “Advanced” gear icon at the top of the window, then on the Port Mapping tab. Create a port mapping rule that looks like the image, below.3 Name it whatever you want, but don’t advertise the service using Bonjour.
- Update the router.
E1000
-
Disconnect from your AirPort and plug into one of the LAN ports on the E1000. You’ll get a DHCP address.
-
Browse to the E1000’s management interface (the Gateway address you pulled from DHCP).
-
Connect the WAN port of the E1000 to a LAN port of your AirPort Extreme. The E1000 should pull the DHCP address you reserved for it (in my case, I reserved 10.0.1.5). (Look in the upper-right of any page).
Under Security > Firewall, disable the SPI Firewall.
-
Under Administration > Management, scroll to “Remote Access” and enable Web GUI Management.4(http://jehanalvani.com/weblog/2012/1/23/fios-with-an-airport-extreme.html#fn:4)
-
At this point, your computer should be able to ping the AirPort Extreme by pinging the E1000’s WAN interface gateway address (which is the AirPort Extreme - 10.0.1.1).
-
Under Setup > Basic Setup, scroll down to Network Setup and assign the E1000 an IP address in the same network as the public IP.
- Set the Gateway IP to the LAN IP of the AirPort Extreme.
-
Now you’ll do the one-to-one NAT. The goal of this is to eventually present the Actiontec on the network created by the AirPort Extreme with an IP address on the AirPort’s network, allowing the Actiontec to get to the Internet.
-
Put your computer on the network created by the AirPort, and browse to the E1000.
-
Under Administration > Commands, you’ll see a text field, and several buttons. You use the text field to enter commands used by the router for different functions. The first series of commands you’ll need is a startup script that logically splits the WAN interface into two subinterfaces. One for the E1000, and one for the NATed Actiontec.
Fill your values into the script below:
	# Save Statup
    WANIF=`get_wanface`
    ifconfig $WANIF:1 [Reserved IP for E1000]  netmask [AirPort LAN Netmask] broadcast [AirPort LAN Broadcast]
    ifconfig $WANIF:2 [Reserved IP for Actiontec] netmask [AirPort LAN Netmask] broadcast [AirPort LAN Broadcast]
Mine looks like this:
	# Save Statup
    WANIF=`get_wanface`
    ifconfig $WANIF:1 10.0.1.5 netmask 255.255.255.0 broadcast 10.0.1.255
    ifconfig $WANIF:2 10.0.1.6 netmask 255.255.255.0 broadcast 10.0.1.255
Click “Save Startup” button to save the script as a startup script.
-
Now we need to add a firewall script that will translate the NATed address of the Actiontec to the DHCP external IP address that the Actiontec will be expecting5.
Again, fill your values into the script below:
 	# Save Firewall
    iptables -t nat -I PREROUTING -d [Reserved IP for Actiontec] -j DNAT --to-destination [Public IP Address]
    iptables -t nat -I POSTROUTING -s [Public IP Address] -j SNAT --to-source [Reserved IP for Actiontec]
    iptables -I FORWARD -d [Public IP Address] -j ACCEPT
Mine looks like this:
	# Save Firewall
    iptables -t nat -I PREROUTING -d 10.0.1.6 -j DNAT --to-destination 50.50.25.25
    iptables -t nat -I POSTROUTING -s 50.50.25.25 -j SNAT --to-source 10.0.1.6
    iptables -I FORWARD -d 50.50.25.25 -j ACCEPT
-
-
Click “Apply Settings” then “Save”.
Actiontec
- Connect your laptop to the Actiontec and log into its web interface.
- Under My Network > Connection Properties > Broadband Connection (Ethernet), you’ll set a static IP, using the same IP it has pulled from Verizon via DHCP. Make sure to set the appropriate DNS servers, as well6.
- Connect the WAN Port of the Actiontec to a LAN port of the E1000.
AirPort Extreme
- Connect the ethernet port of the ONT to the WAN port of your AirPort Extreme.
You should be cooking with gas, now, kids. Test everything, including internet access on the AirPort Extreme network, on the Actiontec network. Video on Demand, and remote DVR scheduling.
Once everything is working the way you want it, disable wireless on the E1000 and the Actiontec.
-
If you buy stuff from any of these Amazon links, I get a little kickback. ↩︎
-
Installing DD-WRT is a tricky process, and it varies by model. Here are the install instructions for the E1000, but you should read everything you can about this and be thorough. Take your time. Don’t rush it. Come back when you’re done. ↩︎
-
Port 4567 is supposedly open to permit Verizon to remotely upgrade the Actiontec Router. I’m not really down with that, and I’ve since removed the portmap, effectively blocking Verizon’s access into the Actiontec. I’ve noticed no ill effects since doing this, but YMMV. ↩︎
-
Thanks to Justin Bowers for help making the documentation more usable in the real-world. ↩︎
-
We’ll assign the Actiontec’s WAN IP statically in a bit. ↩︎
-
I chose to use OpenDNS, seems a little slower than the Verizon-provided DNS. I’m still not sure if I’m going to stick with it. ↩︎